After a long and tiring day we want to have a pleasure shower and take away all our tirdness and stress. But what do we get? A feeble trickle of water that barely does the job. If this sounds all too familiar, you are not alone.
Many modern shower heads come equipped with what’s known as a “water restrictor.” Now, this water-saving device is meant to be all environmentally friendly and wallet-conscious, but what it often does is turn your shower experience into a lackluster affair.
But Don’t worry! In this blog we will explore this perplexing situation and provide you with a clear path toward shower bliss. We’re going to delve deep into the realm of shower heads, water restrictors, and how you can remove them to reclaim the invigorating shower you deserve.
Why Remove the Water Restrictor?
Before we get our hands wet, let’s grasp why some shower heads have these water restrictors. These tiny contraptions are like water-saving guardians, controlling how much water flows through. Great for Mother Earth and your wallet, but not so great when your shower feels like a raindrop sneeze.
Tools You’ll Need
First things first, gather your tools for this DIY adventure:
- Adjustable wrench (a twisty-turny tool)
- Pliers (your grip buddies)
- Screwdriver (in case it’s stubborn)
- Teflon tape (sticky helper for later)
Step 1: Halt the Water Flow
Start by giving the water a time-out. Turn off the shower’s water supply so it doesn’t photobomb your tinkering.
Step 2: Free the Shower Head
Use that adjustable wrench to gently unscrew the shower head from its arm. If you’re worried about scratches, wrap the shower head in a cloth blankie.
Step 3: Spot the Sneaky Water Restrictor
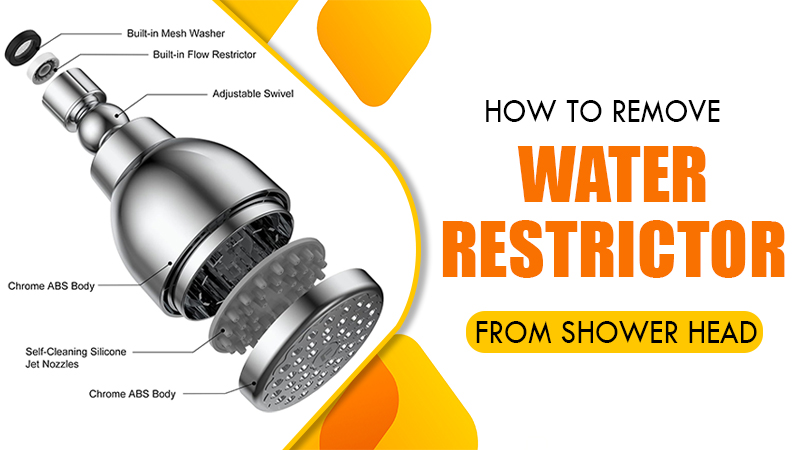
Peek inside the empty spot where the shower head used to be. If you spot a colorful plastic or rubber friend, wave hello – that’s the water restrictor saying, “Hi, I’m the reason your shower’s been meh.”
Step 4: Liberate the Restrictor
Depending on your shower head’s style, you’ll either use pliers or a screwdriver for this heroic act. Hold the restrictor gently and twist it counterclockwise to set it free. If it’s playing hard to get, wrap pliers with a cloth so they don’t scratch the rebel.
Step 5: Spa Day for Your Shower Head
While you’re in the cleaning mood, give your shower head a spa treatment. Get rid of any gunk or mineral build-up. Once it’s polished and pretty, put it back on its arm, making sure it’s snug. Wrap Teflon tape around the threads before reuniting them for a watertight bond.
Step 6: Release the Water!
Time for the big reveal! Turn on the water supply and brace yourself for a mightier water flow. Feel that difference? That’s the feeling of victory.
The Benefits of Removing the Water Restrictor
Now that you’ve conquered the art of removing the water restrictor, let’s talk about the sweet rewards you’re reaping by taking this step. Here’s a breakdown of the benefits that come with ditching that flow-limiting culprit:
Revitalized Water Pressure:
The most obvious advantage is the instant boost in water pressure. Bid farewell to those lackluster drizzles and say hello to a powerful and invigorating cascade of water. Your shower experience is about to level up!
Quicker Rinsing:
Remember the struggle of rinsing shampoo out of your hair or soap off your body with a weak flow? Removing the water restrictor cuts down on the time it takes to rinse off, making your showers not only more enjoyable but also more efficient.
Improved Comfort:
A strong water stream can provide a more soothing and relaxing sensation on your skin. It’s like giving yourself a mini massage every time you step into the shower. Say goodbye to the shower shivers and hello to a warm and comforting embrace of water.
Enhanced Cleaning Power:
With increased water pressure, cleaning the shower itself becomes a breeze. No more struggling to get rid of soap scum or grime – the higher flow will help you tackle those cleaning tasks with ease.
Boost in Mental Well-being:
Believe it or not, a satisfying shower can have positive effects on your mental state. A rejuvenating shower helps wash away stress and leaves you feeling refreshed and ready to take on the world.
Potential Water Savings:
While it might seem counterintuitive, removing the water restrictor could lead to water savings in the long run. With a stronger flow, you might find yourself spending less time in the shower overall, offsetting the slight increase in water usage.
Conclusion
By following these simple steps, you’ve successfully removed the water restrictor from your shower head, reclaiming the invigorating shower experience you’ve been missing.
Remember, while removing the restrictor might increase water consumption slightly, the trade-off is often worth it for the increased comfort and satisfaction.
Enjoy your revitalized showers, and revel in the power of a full-flowing stream that washes away the stresses of the day!
Remember that your shower head might vary in design, so be cautious and adapt the steps as needed. If you’re unsure or encounter difficulties, don’t hesitate to consult the manufacturer’s instructions or seek professional assistance.
Pingback: How to Choose the Right Low Flow Shower Head for Water Savings - showerbrand.com
Pingback: Bigger Shower Head: Understanding the Impact on Water Usage
Pingback: Shower Arm Length: Try these 2 Easy Methods to Find!
Pingback: 10 Best Waterfall Shower Heads To Look For (Cheap To High-End) - showerbrand.com
Pingback: Handheld Shower Heads: 14 Best Picks for you in 2024
Pingback: Best Low Flow Handheld Shower Head